Monday, October 15, 2012

Tilapia in a Mustard Sauce with Roasted Broccoli - from Ina Garten!!!

Thanks to a great friend of mine Sharon, I now know a little about the "Barefoot Contessa", otherwise known as Ina Garten.  On a walk one day in the neighborhood during the visit with my family who lives in Florida, my sister, niece and I stopped by her house to visit, and a cookbook caught my eye.  I didn't know much about Ina, and Sharon was sweet enough to let me borrow it.  Finally 2 months later, I tried two of the recipes in there and both were quite tasty!

Mustard-Roasted Fish

Believe it or not, I followed the recipe exactly, so you can just go to the link to get all the information.  The only difference was that I *thought* I bought whole grain mustard, but it was actually whole grain garlic mustard.  But I love garlic, and it actually added a tasty flavor to the overall dish.  It was totally fine in an ovenproof baking dish (that I did coat with cooking spray) and I used tilapia which is such a light, easy to work with fish.  It picks up whatever flavors you give it and my family and I thought it was a huge success.


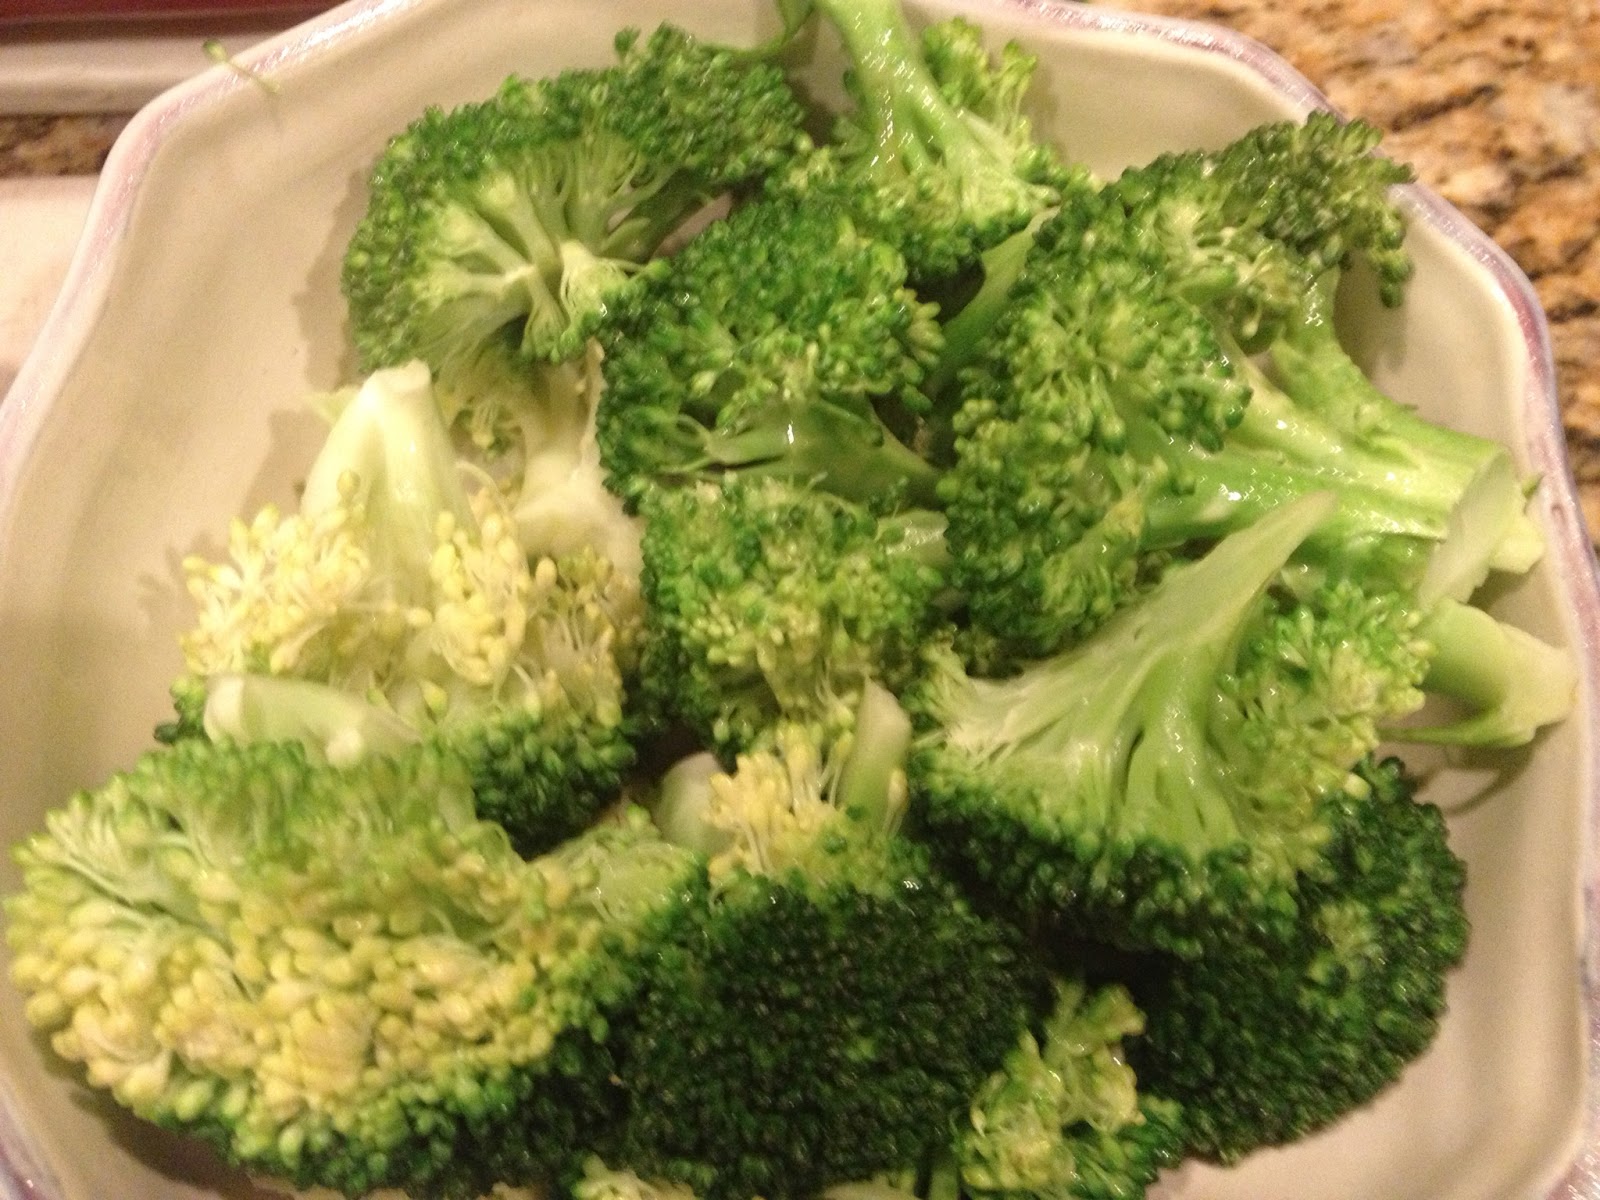
Parmesan-Roasted Broccoli

I followed this one to a tee as well - it was a recipe to make 6 servings, so I did cut it back quite a bit to serve our family of 3.  Her tip to toast the pine nuts is to sautee them in a dry sautee pan on low heat, and it worked.  You definitely want to serve it while it's piping hot and soaks in all the flavors from the other ingredients!  Another tasty, interesting dish!


Since I was making two dishes basically from scratch, I made the other side dishes a little easier on myself.  I used organic rotini and after it was cooked and drained, I simply mixed it with pesto sauce and topped with parmesan cheese.  And my faves...those No Sugar Ruby Red Grapefruit slices.  They are a bit pricey, but they ensure that I'm getting my Vitamin C without a lot of added stuff.


And here's my plated meal that was delicious and nutritious!  Topping a small amount of pasta with the broccoli made for a veggie heavy meal!


It's always fun to find new chefs and recipes, so if you have any favorites, let me know!  I still owe a post from a Chicken Chili that I made Saturday night from the Hungry Girl Cookbook.  But no one is going to know what to do with the TWO posts I put up tonight!!!  Things have just been kind of crazy, and sometimes I'm playing Pandora on my phone and forget to take pictures - and can't imagine a food blog without pics.  So...tomorrow night is a Roasted Shrimp Cocktail from Ina's cookbook that looks quite tasty!  See you soon :)

Bacon-Wrapped BBQ Chicken (Another Hungry Girl Hit!)

I promise you - Lisa Lillien, aka Hungry Girl, does NOT pay me to advertise her recipes.  She might not even like me since I sometimes post things that can't be found online - BUT - hopefully you will be looking further for her delicious recipes and buying a cookbook or two yourself.  She was even on Good Morning America today featuring her breakfast options which are amazing!

Now here is an EASY and DELICIOUS filling recipe that your family will love!  You'd think bacon would be off the table - and turkey bacon can be used - but the center cut bacon is a lot less in fat as well and makes you feel like you're not giving anything up b/c it is truly bacon, just a lot leaner and crispy.


Nutritional Information

This is per serving for (1) 5 oz Chicken Breast Serving (I made 4 since I have a family of 3, and just adapted the ingredients accordingly)

One 5-ounce raw boneless skinless lean chicken breast cutlet
2 tbsp BBQ sauce with appx 45 calories per 2 tablespoon serving
2 slices center cut bacon or turkey bacon

Directions:

Preheat oven to 375 degrees.  Spray a baking pan with nonstick spray.  Season chicken with a dash each of salt and pepper and coat with bbq sauce.  Wrap bacon around chicken and place in the pan.  **For this part, I was a little confused as to how to roll it - but I just played around with it and figured it out.  Then realized there was a picture on another web page!  Ooops**  You can see Lisa's picture here.

Bake in the oven until chicken is fully cooked, about 20 minutes.  Set oven to broil and broil chicken until bacon is crispy, about 4 minutes.

Serve and ENJOY!!!

I served it up with a risotto, but didn't really do a step by step on how I made that.  Basic steps are to sautee some chopped peppers, onions and celery in olive oil.  Once soft, add in 1 cup of arborio rice and sautee for a few minutes, then gradually add in chicken stock.  Along the way, continue to add stock to keep the risotto from drying out.  Also add in a touch of parmesan cheese, lemon juice, and a smidgen of half and half.  It's one of my husband's favorites, so although I know it's not "Hungry Girl" worthy, I will continue to indulge him and simply practice portion control for myself.


Simple side dishes - sauteed spinach with some garlic and mixed with parmesan cheese...and some No Sugar Added ruby red grapefruit - love that stuff!

Monday, October 8, 2012

Coconut Shrimp and Yummy Noodles!

Okay...let me just give a YUMMY shout out for this one!  I love me some coconut fried shrimp, but this one was BAKED and very healthy and low cal/low fat/low everything!  And I did not change a THING from her original recipe!!!   Delicious and I served it with the Fettucine Alfredo from her cookbook that I have made in the past.  Along with some edamame! 

HG's Sweet Coconut Crunch Shrimp


HG's Sweet Coconut Crunch Shrimp

Bigtime Shrimp!
Once you start popping these sweet-n-crispy shrimp, you're not gonna be able to stop. Good thing they're guilt-free...

Ingredients:
1/4 cup Fiber One bran cereal (original)
1/3 cup shredded sweetened coconut
3 tbsp. panko breadcrumbs
1/4 tsp. chili powder
1/8 tsp. garlic powder
1/8 tsp. black pepper
Dash salt
12 oz. (about 20) raw large shrimp, peeled, deveined, tails removed
3 tbsp. fat-free liquid egg substitute (like Egg Beaters Original)

HG Tip! If your coconut shreds are somewhat long, give 'em a rough chop!

Directions:
Preheat oven to 400 degrees.

Place cereal in a sealable plastic bag and, removing as much air as possible, seal. Using a meat mallet or heavy can, carefully crush cereal through the bag. Add sweetened coconut, panko breadcrumbs, chili powder, garlic powder, black pepper, and salt to the bag; seal and shake to mix. Transfer mixture to a large plate and set aside.

Spray a large baking sheet with nonstick spray and set aside. Pat shrimp with paper towels to ensure they are completely dry.

Combine shrimp with egg substitute in a bowl and toss lightly to coat. One at a time, shake excess egg from shrimp and transfer to the coconut-crumb mixture, gently patting and flipping to coat. Evenly place coated shrimp on the baking sheet.

Bake in the oven for 10 - 12 minutes, until outsides are crispy and lightly browned and insides are cooked through. Serve and enjoy!

MAKES 4 SERVINGS

Serving Size: 1/4th of recipe, about 5 shrimp
Calories: 164
Fat: 4.5g
Sodium: 266mg
Carbs: 12g
Fiber: 2g
Sugars: 3.5g
Protein: 19.5g

PointsPlus® value 4*

Fettuccine Alfredo with a PointsPlus® value of 2*!!!
Fettuccine Hungry Girlfredo!

(81 Calories, 3g Fat, 242mg Sodium, 9g Carbs, 4g Fiber, <1g Sugars, 4g Protein = PointsPlus® value 2*)

This recipe will rock your world.  Share it with everyone you know...ASAP! 
Ingredients:

1 Package
Tofu Shirataki Fettuccine Shaped Tofu Noodles
1/2 Wedge The Laughing Cow Light Cheese
1 teaspoon Fat Free Sour Cream
2 teaspoons Kraft Reduced Fat Parmesan Cheese
Salt & Pepper (if desired)

Rinse fettuccine noodles VERY well.  Microwave them for one minute, then drain them and pat dry. Add cheeses and sour cream.  Mix thoroughly.  Microwave to help melt cheese further, and mix some more.  Add salt and pepper to taste.  Enjoy.  Serves 1.


My pics:

I made a dipping sauce with horseradish sauce and orange marmalade - still LOW in calories and everything else!


Love me some edamame!!!

For whatever reason, my noodles picture won't come through, so just look at hers and admire.  It is SUCH a great way to eat pasta without any guilt!!!

Went on an 8 mile walk tonight and made yet ANOTHER HG recipe - some delicous bacon wrapped chicken.  Will post that tomorrow b/c it was deemed another home run!!!


Tuesday, October 2, 2012

Comfort Food without All the Calories and Guilt

Yep...another Hungry Girl recipe - and once again it did not fail to satisfy!  Seriously - I have to question the calorie count in this one b/c it was UBER tender and delicious and filling!  Instead of serving it with true cole slaw, I used just the mix - gave it the crunch and taste of cole slaw without mayonnaise or other additions. 

I also made my friend Laura's famous Mac 'n Cheese recipe - not sure of the calorie count, but I did use all low fat or reduced fat ingredients, and again, it's all about the portion control.  Served up some small side salads and for those who wanted a bun, I had those on the ready - figured I could do without and I did!

Got in 70 minutes on the treadmill again (have been hitting it every day!) and had an all around great day!  Chilling with the hubster now and watching some TV  :) 

'Cue the Pulled Pork

PER SERVING (2/3 cup): 220 calories, 6g fat, 540mg sodium, 16g carbs, 1g fiber, 12g sugars, 24g protein -- PointsPlus® value 5*
No-guilt BBQ pork!?! Prepare to be wowed...


Ingredients:
1 cup canned tomato sauce
1/2 cup ketchup
2 tbsp. plus 2 tsp. brown sugar (not packed)
2 tbsp. plus 2 tsp. cider vinegar
2 tsp. garlic powder
2 cups sliced onion, cut into 2-inch strips
3/4 lb. raw lean boneless pork tenderloin, trimmed of excess fat
3/4 lb. raw boneless pork shoulder (the leanest piece you can find), trimmed of excess fat
Optional: crushed red pepper

Directions:


To make the sauce, place all ingredients except onion and pork in the crock pot. Stir until mixed. Add onion and pork and coat well with the sauce.  Cover and cook on high for 3 - 4 hours or on low for 7 - 8 hours, until pork is fully cooked.

Remove all the pork and place it in a large bowl. Shred each piece using two forks -- one to hold the pork in place and the other to scrape across the meat and shred it.  Return the shredded pork to the crock pot and mix well with the sauce.

If you're serving a group, keep the crock pot on its lowest setting, so the pork stays warm. If you like, season to taste with crushed red pepper. Yum time!

MAKES 6 SERVINGS


Laura's Famous Mac 'n Cheese

7 ounces of macaroni (yes - only 7!)
2 cups small curd cottage cheese (I used reduced fat)
1 cup sour cream (I used 1/2 cup non-fat and 1/2 cup fat free)
1 egg
8 oz cheddar cheese (I used reduced fat)
1/2 tsp salt
dash pepper
paprika

Cook macaroni and drain.  Combine cheddar cheese, sour cream, egg, salt and pepper, then add cheese.  Add in macaroni and pour into greasted dish.  Bake for 45 minutes at 350 degree for 45 minutes (I overbaked mine a bit - got caught multitasking too much).  But it was still delicious!  Add a bit more cheese and paprika and cook another 5-10 minutes.


Takes the Cake - Ziti Bake!!!

Still on my "Hungry Girl" kick for recipes - and found another one that totally delivers on taste and feeling full!  Found it on her website, and it's also in her "300 under 300" cookbook - page 230.  Believe it or not, the only changes I made were to do the mushrooms on the side (for Miss Picky) and next time I make it, I will saute the spinach in its own pan - the garlic and onion were soft and I felt like I was over cooking them when I added in the spinach. 

Other than that, even though it only calls for 5 oz of pasta, that's all we needed to make the full recipe in an 8 x 8 square baking pan.  And it's even vegetarian, Michele!  I guess not vegan b/c of the cheese, but I'm sure there are cheese substitutes available.  Paired it with some steamed broccoli and served the mushrooms on the side (piled them on my serving!) and it was a hit!  Bon appetit!  I have her pulled pork recipe simmering in the slow cooker while we speak - update later today or tomorrow!


Takes The Cake - Ziti Bake


Ingredients:

5 oz. (about 1 1/2 cups) uncooked whole-wheat or high-fiber ziti or penne pasta
1 cup thinly sliced onion
2 cups chopped brown mushrooms
1 tbsp. chopped garlic
2 cups fresh spinach
3/4 cup low-fat/light ricotta cheese
2 tbsp. chopped fresh basil
1 1/2 cups canned crushed tomatoes
1/2 cup plus 2 tbsp. shredded part-skim mozzarella cheese, divided
2 tbsp. reduced-fat Parmesan-style grated topping

Directions:


Preheat oven to 375 degrees.

Prepare pasta al dente according to package directions. Drain well, place in a large bowl, and set aside.

Meanwhile, bring an extra-large skillet sprayed with nonstick spray to medium heat on the stove. Add onion and, stirring occasionally, cook until slightly softened, about 3 minutes. Add mushrooms and garlic, and raise temperature to medium high. Continue to cook, stirring often, until mushrooms are soft, about 3 minutes.

Add spinach to the skillet and, stirring often, cook until spinach has wilted and excess moisture has evaporated, about 8 minutes. Remove from heat, and stir in ricotta cheese and basil.

Transfer contents of the skillet to the bowl with the cooked pasta. Add tomatoes and 1/2 cup mozzarella cheese. Toss gently to mix.

Spray an 8" X 8" baking pan with nonstick spray, and carefully fill with contents of the bowl. Evenly top with Parm-style topping and remaining 2 tbsp. mozzarella cheese.

Bake in the oven until entire dish is hot and cheese on top has melted, about 15 minutes. Allow to cool slightly, and then serve and enjoy!

MAKES 4 SERVINGS

Monday, October 1, 2012

Guilt Free Shrimp Scampi with "Pasta-Less" Pasta

So...this was actually Saturday night's dinner...but figured I definitely wanted to get the word out on this tasty piece of heaven!  I love shrimp scampi, especially the buttery, garlicky noodles - this was a very reduced calorie/fat version and used the shirataku noodles for the pasta.  I love to have some pasta that actually TASTES like pasta but is guilt free!  And believe it or not, the only thing I changed was sauteeing in some spinach and adding it to the pan when I added the noodles at the end.  And added in a splash of white wine when I added the lemon juice.  Oh...and sauteed some mushrooms on the side that I used for mine only :)

Seriously - another home run and loved by the entire family!!!  :)


Hungry Girl Shrimp Scampi with Shirataki Noodles

Ingredients:

1 small lemon
2 packages
House Foods Tofu Shirataki Fettuccine Shaped Noodle Substitute
1/4 cup chopped onion
1 tsp. chopped garlic
8 oz. raw shrimp, peeled, tails removed, deveined
1 plum tomato, chopped (I used canned diced tomatoes sauteed with garlic)2 tbsp. light whipped butter or light buttery spread (like
Brummel & Brown)
2 tsp. reduced-fat Parmesan-style grated topping
Optional: salt, black pepper, crushed red pepper, chopped parsley


Directions:

Cut lemon in half, and squeeze the juice from one half into a small dish; remove any seeds, and set aside. Cut the other half into wedges, and set those aside as well.

Use a strainer to rinse and drain shirataki noodles well. Pat dry. In a microwave-safe bowl, microwave for 1 minute. Drain excess liquid. Dry as thoroughly as possible, using paper towels. Cut noodles up a bit, using kitchen shears if you've got 'em. Set aside.

Bring a skillet sprayed with nonstick spray (butter flavored, if you've got it) to medium heat. Add onion and garlic, and cook until softened, 2 - 3 minutes.

Add shrimp and tomato. Stirring occasionally, cook until shrimp are opaque, about 2 minutes. Add lemon juice and continue to cook and stir for 1 minute.

Raise heat to medium high, add shirataki noodles, and mix well. Continue to cook for 1 - 2 minutes, until entire dish is hot and shrimp are cooked through. Add butter and stir.

Plate (or bowl!) your scampi, and top each serving with 1 tsp. Parm-style topping. Garnish with lemon wedges and, if you like, season to taste with optional ingredients. Enjoy!

MAKES 2 SERVINGS

Serving Size: 1/2 of recipe (about 1 3/4 cups)
Calories: 238
Fat: 8.5g
Sodium: 329mg
Carbs: 14g
Fiber: 5g
Sugars: 2g
Protein: 26g

PointsPlus® value 6*

Sunday, September 30, 2012

Triple Threat Stir Fry - YUM!!!

So...this will be an interesting kind of post.  I did take "inspiration" from a Hungry Girl recipe, but really didn't follow it to a tee - as a matter of fact, I made more changes than kept the same.  But still, her simple yet flavorful looking recipe led me to make something I have made in the past, so I will still give her credit, where credit is due. 

Her recipe is called the Tempting Teriyaki Trifecta - but because my spin on it is VERY different, I will post my recipe, and also call to your attention what her original directions were.  It is on page 330 of the "300 Under 300" cookbook...and definitely gave us an asian fix without the calories or carbs.

Ingredients:

6 oz lean fillet, sliced (we used actual filet mignon)
8 oz raw boneless skinless, lean chicken, sliced (hers called for less but we wanted more protein)
6 ounces raw shrimp, peeled and deveined, tails remained.
Hers called for a frozen vegetable medley - decided to use the real thing!:
Chopped broccoli florets
Sliced Onions
Matchstick Carrots
Sliced Celery
Chopped Green Onions
Sliced Water Chestnuts
Sliced Mushrooms
Teriyaki Sauce/Marinade
Wok Oil
Chow Mein Noodles


Start by getting the wok hot and using some wok oil in there.  Begin with the chicken as it will take the longest to cook.  Then the broccoli florets.  In order from there, sliced onions, filet, carrots, celery, green onions, shrimp and then water chestnuts.  Also toss in a bit of the teriyaki sauce and the low fat sesame/ginger dressing.  I know you see mushrooms, but bear with me as I have a non-mushroom loving family!

After a good 6-8 minutes, all of the vegetables were cooked with a nice crisp, and the proteins were cooked through without being tough or raw.  So I pulled that out of the wok and put it into a serving dish and into the oven to warm.

I had already started the water for the jasmine rice, so that was ready to roll.  Two more things that needed woking - first put the bean sprouts in with a dash of wok oil and once they were warmed through I gave them their own container to continue warming in the oven.  Last item - MUSHROOMS.  My favorite but my family does not like that.  Wok'ed them a bit and put them in a small container in the oven.

So by that time, the rice was done and all containers in the oven were warm and tasty looking.  I set my items on the counter and took some pics - rice, stir fry, bean sprouts, mushrooms, and chow mein noodles for a topping.


So here is the delicious plate I put together - lots of protein and low in carb and fats. 

 Delicious, tasty and filling!  Low in calories, fat and carbs.  Stay tuned tomorrow night for my version on her fantastic shrimp scampi with shiratuki noodles from Saturday night!

Thanks for the 1000+ views!  I feel like a million bucks :)